Still Fillin’…Still Paintin’
Some real progress now: first up is the repair job to the step. 
 With all of the rust treated, a couple of coats of primer were applied to blend in with the white paint. The step is then built up with 9mm ply, Grippfilled onto the existing metal and ply. A new top step is cut out also from 9mm ply jigsawed out to fit the profile. It’llbe covered by the new flooring, so only needs to be a support to stop the floor from bending under pressure. Before the new top step is attached, the mechanism is screwed down, to stop any movement, and all the gaps are filled with Gripfill to provide a seal from any dirt getting in. All ready for the new floor to go down…
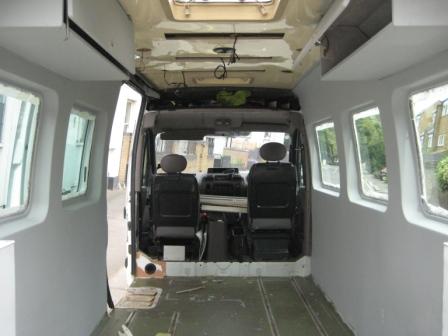
With both walls, and the cupboards having had two coats of primer and ready for the final coat, we start on the ceiling. Where the striplights have been taken out, ply covers are to be cut and screwed to the molded plastic ceiling. Once the electrics are installed, these panels will hold the LED lights, and so there’ll just be screwed into place for easy access. The ceiling is then primed which really pulls the interior together.
As mentioned earlier, most of the interior already has insulation, but there were some sections that just had a plastic skin over the painted metal, such as the side and rear doors. These, along with the sections of ceiling would have to be filled with insulation to limit condensation, as well as keeping Trev at a bearable temperature in summer or winter…
To insulate, some regualr houshold insualtion roll was bought. All of the necessary panels removed, and insulation stuffed in as much as possible. 
(a learning…this stuff isn’t as friendly and soft as it first seems…I’m off to buy some marigolds…)
The whole van is now pretty much insulated. The next step is a big one, to fit the new floor. We’ve decided to lay a new 9mm ply floor for a couple of reasons. The first being that a layer of insulation and an extra ply floor will provide better insulation than just the ply and vinyl floor already laid on the orignal metal chassis. The second is that the Unwin tracking for the chairs/ wheelchairs is pretty much welded to the floor and so would be very tricky to remove. This means to get a decent floor, we’d have to level out with more insulation, lay a ply floor on top, and vinyl over that. With a bit of luck, the height difference in the rails and the vinyl wouldn’t cause the floor to crack the first time someone walked over it…
 We start by cutting a section of ply to fit between the wheelarches. The original plan is to create the floor in three sections lengthways, meaning as few joins as possible. This is soon proved to be a difficult one, as the tracks cause the ply to warp over each of them. By carefully screwing down the ply around the tracking, the floor panel was fixed down, and became fairly solid. With a bit of time, and a little adjustment on the screws, this should work out for a solid floor section. To make life easier, it wass decided to start running long, thin sections of plyover only one of the tracks at a time to limit the amount of bending force on them. After a tiring afternoon of cutting, sanding and fixing down, we have half a floor….
To lay the floor in this way will obiously take longer, but will hopefully give a stronger floor, and one which shouldn’t be under quite as much pressure…The only issue then will be to make sure that all of the floor sections are at the same height, ready for the vinyl to cover the whole thing up! This should be possible using a screwdriver, mastick and a fair bit of our free time…

Very impressive. We look forward to seeing Big Trev in person
How exciting – can’t wait to see the project as you go along!